One of the most common and troublesome problems in injection molding is flow marks. These wavy lines, stripes, or dull patches that appear on the surface of the parts, which are usually typical manifestations of flow mark defects, may turn high-quality designs into substandard products.
What Are Flow Marks in Injection Molding?
Table of Contents
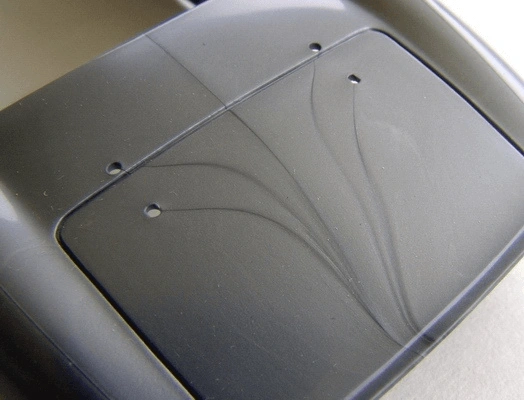
ToggleFlow marks or Flow lines are surface defects caused by uneven or turbulent flow of molten resin when filling the mold cavity. Understanding the types of Flow marks – such as wavy lines, stripe patterns, or dull areas – helps for accurate identification, especially for components with transparent, matte, or high-gloss surfaces, as these defects are easy to detect and cannot be ignored.
Unlike minor flaws, the Flow marks defect is not merely an appearance defect. It may indicate potential problems with materials, mold design, or processing, which could affect the structural integrity of thin-walled injection-molded parts over time.
Compliance with ISO standards and maintaining consistent quality are necessary conditions for market acceptance. If not addressed promptly, Flow marks may lead to costly rework, scrapping, or even order cancellation.
What Causes Flow Marks in Injection Molding?
1. Material-Related Issues
The selection of resin plays a crucial role in avoiding flow marks. The use of resins with a lower melt flow index (MFI) may cause the material to have difficulty flowing smoothly into the thin and structurally complex parts of the mold cavity, directly leading to Flow marks in injection molding.
Moisture in the resin is another major factor. Moisture-absorbing materials like PC or TPU need to be thoroughly dried before injection molding. Even a small amount of moisture can cause uneven flow and surface defects.
Incompatible additives or colorants may also disrupt the flow. For custom-colored molded parts, it is crucial to ensure that the colorant is well mixed with the base resin to avoid striped flow marks.

2. Mold Design Defects
Many injection molding products have complex geometric structures – such as slender edges, delicate hollow designs, and functional grooves – all of which pose extremely high demands on mold design. Gates of improper size or position may generate extremely high shear stress, which can cause fluid flow disorder and leave flow marks.
Insufficient ventilation is a common mold problem. The air retained in the cavity will interfere with the flow of the resin, causing wavy patterns to appear on the surface. Narrow or uneven flow channels may also slow down the flow rate in certain areas, thereby causing premature cooling and leaving traces.
A rough mold surface will increase friction, making it more difficult for the resin to flow smoothly. For high-gloss injection molded parts, minor surface defects on the mold may also amplify flow marks.
3. Injection Molding Equipment Problems
The incorrect melting temperature is the primary cause of the Flow mark defect. If the resin temperature is too low, it will not flow freely. If the temperature is too high, deterioration may occur, and uneven textures may be produced – both of which can lead to flow marks in injection molding.
The injection speed and pressure need to be carefully calibrated. If the speed is too slow, the resin will have cooled down completely before filling the cavity, thus failing to fill it evenly. If the speed is too fast, it will cause turbulence. This is particularly important for thin-walled injection molding parts, as such parts are more sensitive to changes in flow rate.
Uneven or too low mold temperature can lead to uneven curing of the resin, leaving visible flow marks. Maintaining pressure or insufficient time can also lead to incomplete filling, thereby exacerbating the problem of flow marks.
How to Diagnose Flow Marks: Step-by-Step Checklist
The diagnosis of flow marks requires a detailed visual examination first. The key areas of focus include the area near the gate, around the complex cutting sections, and along the slender edges – these are often the areas where different types of flow marks most frequently appear.
Next, check the processing log to see if there have been any recent changes in the melt temperature, injection speed, or mold temperature. Even minor adjustments can cause flow marks in sensitive designs.
The quality of the material is verified by checking whether the resin has been dried as required and whether it remains consistent among different batches. Incompatible or low-quality resins may be the potential cause of flow marks.
Finally, check whether the mold is worn, the flow channel is blocked, or the exhaust hole is blocked. Conducting rapid mold trials – adjusting one parameter at a time – helps to efficiently identify the root cause.
How to Fix Flow Marks in Injection Molding
1. Material Adjustments
If fluidity becomes an issue, it is recommended to switch to a resin with a higher MFI value (more suitable for making thin-walled components). This adjustment is an effective way to avoid the formation of flow marks from the material source during the injection molding process. It is recommended to consult the material supplier to select the appropriate grade for the specific design.
Ensure that the water-absorbing resin is thoroughly and evenly dried. It is crucial to follow the recommended drying time and temperature
Only use compatible additives and colorants. Test a small batch of samples first to ensure smooth mixing of the colorant with the base resin and avoid streaks or uneven flow.
2. Mold Modifications
Optimizing the gate design – such as increasing the gate area or repositioning to enhance the uniformity of the flow channel – can effectively eliminate flow marks caused by shear force. Fan-shaped gates or edge gates are usually more effective than point-shaped gates. Manufacturers can avoid flow marks in the injection molding process through mold optimization.
Improve exhaust. Adding or widening exhaust holes in areas with high bubble accumulation (such as complex cuts) can release trapped air and promote smooth resin flow. Regularly clean the existing exhaust holes to prevent blockage.
Polish the surface of the mold to reduce friction. A smooth mold surface helps the resin flow evenly, especially suitable for high-gloss injection molded parts, as the surface quality is of vital importance.
3. Processing Parameter Optimization
Gradually increasing the melting temperature of the injection molding equipment (within the safety limit) helps improve the fluidity of the resin, which is an important step to solve the “Flow mark” problem in injection molding. Excessive heating should be avoided as it may lead to a decline in material performance and the creation of new defects.
Strategic adjustments to the injection speed are key. For thin-walled areas, increasing the injection speed can prevent premature cooling. For thicker areas, reducing the injection speed can prevent the generation of turbulence. For complex molded components, adopting a two-stage injection speed often yields good results
Ensure that the mold temperature is uniform. Use a mold temperature controller to maintain consistent heat in the cavity – this helps the resin cure evenly and eliminates flow lines.
Adjusting the Settings for fixed pressure and time can also be helpful. Slightly increasing the fixed pressure helps achieve complete filling of the thin sheet, while extending the fixed time can prevent the resin from shrinking or forming Flow marks during the cooling process.
How to Avoid Flow Mark in Injection Molding
Prevention is always better than post-event defect repair work, which is the key to avoiding flow marks during injection molding. Pre-production inspection should include verifying the quality of materials, checking the wear of molds, and confirming that the processing parameters are consistent with the verified Settings in the design.
Process standardization is of vital importance. Recording the optimal parameters (temperature, speed, pressure) for each mold component model and resin type can ensure the continuity between batches and reduce the occurrence of human errors.
Make a schedule for regular mold maintenance. After every few rounds of production are completed, the injection molds are cleaned, polished, and inspected. Well-maintained molds significantly reduce the possibility of flow marks and other surface defects.
It is valuable to train operators to identify early flow trace images. Early detection of problems can reduce expensive waste and rework, and maintain production progress.
FAQs
Q1: Can I fix the Flow mark in injection molding without modifying the mold?
Q2: Do flow marks affect the strength of injection molding parts?
Q3: Are some resins more prone to Flow marks in injection molding than others?
Q4: How to distinguish flow marks from other defects (such as weld lines)?
Q5: What’s the cost of ignoring the Flow Mark Defect?
Choose YG for Defect-Free Injection Molding
Flow marks are not necessarily an obstacle to the production of high-quality injection-molded parts. By understanding the meaning of flow marks and the causes of flow marks in injection molding, applying appropriate diagnostic tools, and implementing targeted solutions, these defects can be eliminated.
At YG, we specialize in injection molding processes and have many years of experience in manufacturing defect-free components and other parts for consumer electronics. Our expertise in addressing flow marks in injection molding – from diagnosis to prevention – combined with strict quality control processes and a professional engineering team, ensures that our products can meet the highest standards.
Do you wish to avoid flow marks and other injection molding defects in injection molding production? Please contact YG immediately to discuss project matters, request a quotation, or consult the engineering team for personalized suggestions on how to avoid flow marks in injection molds.